

how to create login form with asp.net on visual studio 2017
Benefits of Hosting ASP.NET Web API in IIS
It works like other IIS application so it will have benefits like load balancing, remote deployments. It provides process activation and recycling capabilities which helps to increase the reliability of the application. It is easy and safer to deploy your Web API application to IIS. For a detail description of ASP.NET Web API concepts see Getting Started with ASP.NET Web API
Steps for Hosting ASP.NET Web API in IIS
Create ASP.NET Web API
You can Create ASP.NET Web API application. The article linked with this create an Empty ASP.NET Web API solution and gives you RESTful CRUD methods.
Publish ASP.NET Web API
Open CustomerApp application created in the previous step.
Right click on CustomerApp project and select Publish. You will see Publish Web wizard.
In Profile tab -> Select New Profile from DropDownList and give profile name as CustomerAppProfile.
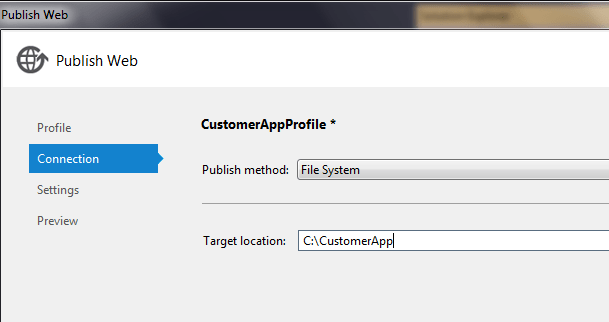
Next is the Connection tab -> Select File System from Publish Method DropDownList. Give path as Target Location where you would like to publish API.
Click the Next button and select Release from Configuration DropDownList and finally click the Publish button.
Host CustomerApp in IIS
Open IIS manager by clicking Windows start -> Run -> enter inetmgr -> click ok
If IIS is not installed on your machine click here to install.
Go to IIS manager and right click on sites and select Add Web site.
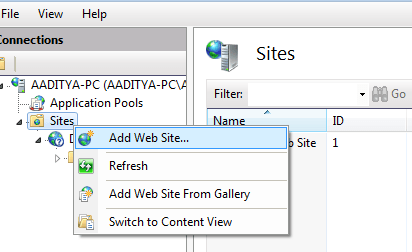
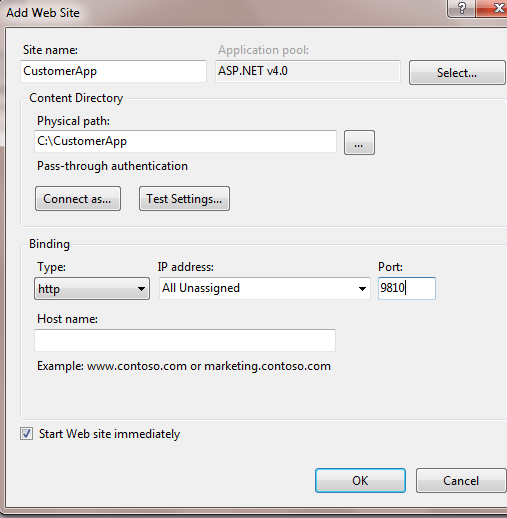
Enter details as shown in below screenshot
- Enter site name as CustomerApp
- Change the application pool to ASP.net V4.0
- Select the physical path of the folder which contains the published ASP.NET Web API. I entered as C:\CustomerApp
- Enter port number on you wish to host API. I use port as 9810.
Browse ASP.NET Web API through IIS
Your Web API is now hosted in IIS. You should be able to browse it through IIS or browser.
From IIS manager -> Select Sites -> right click on CustomerApp (created in previous step) -> Select Manage Web Site -> and select Browse.
It will redirect to http://localhost:9810. As corresponding routing URL is not mapped in CustomerApp, it will throw an IIS error.
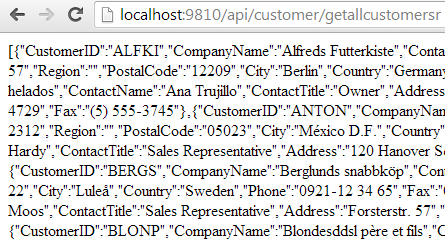
Try below URL for which route mapping has done in Web API.
http://localhost:9810/api/customer/getallcustomersr http://localhost:9810/api/customer/getcustomer/anatr You will see the below output.
Accessing Database under IIS APPPOOL\\ASP.NET v4.0
As we are using ASP.NET v4.0 App Pool make sure IIS APPPOOL\\ASP.NET v4.0 is added to your Database Server -> Security -> Logins.
If it's not there go ahead and add new login with name IIS APPPOOL\\ASP.NET v4.0 or else it will throw run time error exception Login failed for user 'IIS APPPOOL\\ASP.NET v4.0'
how to create login form with asp.net on visual studio 2017
Source: https://geeksarray.com/blog/host-asp-net-web-api-in-iis-using-visual-studio-publish
Posted by: scottmusur1939.blogspot.com
0 Response to "how to create login form with asp.net on visual studio 2017"
Post a Comment