

How To Use Layers To Draw
Practise you ever film a drawing in your listen, simply when you finally put it on newspaper it's a mess? When you rush into it with excitement, yous're likely racing to the end movie, but if you can draw all the layers that come before that end image you'll set yourself up for success.
To describe layers, you lot need to interruption your slice upwards into separate steps: a base layer of general shapes and line art, a layer of lighting and value, and a final layer of texture.
It may seem like doing this unnecessarily adds to your work, merely by layering you save yourself fourth dimension, materials, and frustration.
Things to Practice
Before yous throw yourself into a full-blown, multilayered slice of work you'll want to have a skillful grasp on the medium (or mediums) that you plan on using.
You'll probable want to apply a graphite pencil or a light-colored pencil to exercise the base layer sketch of your piece. Using this, practise hand movements to course basic shapes, circles, and horizontal and vertical lines. I would likewise practice a technique known as "gesture cartoon"; this uses continuous movements and connected lines to draw your bailiwick without looking at the paper.
When yous're just starting you'll probably want to piece of work off a model or an image. Practise identifying master shapes. Exam yourself on noticing where the light source is nigh what yous want to capture, how it hits the piece and any motility in the subject.
As always, brand sure y'all test out how your materials interact with each other. It might be easier if you're using ane medium, only this is rarely the instance when you're drawing in layers. Examination them individually and together.
Base Layer
It doesn't matter how you intend to end your drawing. You're going to want to kickoff with a base of operations to outline the future of your piece of work.
This base of operations layer can be done with your cease medium, only I strongly suggest using graphite pencils in this step. They provide a greater corporeality of control, and, dissimilar well-nigh mediums, you can erase them if you make a mistake.
Work in these 2 steps to set yourself upwards for success:
- Basic Shapes: When you commencement with bones shapes you give yourself more room for change. These create a articulate base for the rest of your piece, but they're also easier to manipulate or move in case you want to stray from your reference.
- Line Art: At this indicate, y'all'll make clean up the mess y'all left behind. Outline the principal areas and other important lines. Refine the piece until it's well divers and recognizable, only leave details to the next stride.
At this point you could easily leave your work alone, and that works groovy if you're merely working on a concept. If you demand more details you'll need to move on to the second layer of work.
Lighting and Shading
Think when I told yous to practice identifying light and move? Here's where you use information technology.
Light is what helps bring the image off the folio. It tells more of a story than a flat image does.
Is it night or day?
Is it light or dark?
Is the calorie-free warm or cool?
How does it hit your subject area?
When y'all've answered all of these things you can breathe life into your piece.
In basic terms, a layout where the shadows of your piece are by darkening them and draw the lighter areas forward by brightening them.
You can still do this with your sketching pencil, but if you're confident enough you lot can brainstorm to utilize colored pencil or another medium of selection. The graphite pencil will be more than forgiving (peculiarly with those shadows), but using colour can add more than value to the piece.
The Final Step: Texture
Although some artists like to do this while working with light and shadows, I prefer to do it afterwards. The previous often influences this pace, and it'southward easier for me to focus on one aspect at a time.
The texture is intrinsic to your piece. It conveys not just how something looks just also how it feels.
Some bones techniques that will assist yous out here include:
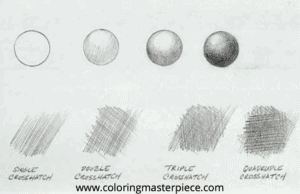
- Bones Hatching: This is also a good way to add value to your slice. Thicker, denser lines will make a section darker on height of providing texture, as will cantankerous-hatching.
- Radial Hatching: Proficient for showing texture in cylindrical or circular forms.
- Expressive Hatching: This technique utilizes random, haphazard lines to indicate diverseness in texture. (Pro Tip: Employ a softer lead here if applicable.)
- Contour Lines: Basic, fifty-fifty lines that add texture and direction as well as an edge.
- Feathering: (Another soft atomic number 82 technique) Use a dark layer, then take a flake sheet of newspaper and rub until marks are soft and blended. Works all-time with graphite.
- Loops: Random loops of varying sizes and shapes can add definition to your piece.
- Dots: These can also impact the value of your piece. Denser areas of dots will make the expanse look darker.
While this list is not extensive, it's a decent place to beginning. Yous can practice these techniques outside of cartoon forms.
Bringing information technology All Together
Later you've finished the texture layer of your piece you'll want to await at it as a whole.
Brand sure all the parts concord with each other and make changes where necessary. Add details that may take been overlooked when working in steps.
Working With Graphite and Colored Pencils
I'thou very much for using graphite for your base of operations layer and mapping out value, but graphite does nothing for adding color to a piece. Your brain can likely easily movement from one medium to the next, but it's not every bit like shooting fish in a barrel as exchanging one pencil for another.
After you've laid down your layer of graphite you volition need to prepare the surface for the colored pencil. Even harder leads are still prone to smudging, and colored pencils will easily selection up graphite that isn't sealed.
To exercise this you'll demand a workable fixative or a retouch varnish. Whatever you cull, make sure information technology's workable and test it on a bit canvass of paper to make check how they react. Make sure the colored pencil works on top later waiting 30 minutes for it to dry.
Beginning with the lowest value colored pencil, and keep your commencement few layers light. Even with the fixative, the colour can yet be dingy by the graphite. These first few layers also help to seal the graphite beneath the wax or oil binding of your colored pencil.
Continue equally you unremarkably would, working up in value every bit y'all add more layers of color. Alloy the colors and then burnish the piece.
Cheque out more colored pencil tips HERE.
How Layers Work With Digital Art
While I'll normally speak on traditional fine art techniques it's worth noting that layers are a huge part of digital art.
I think of digital layers like drawing on clear paper (or plastic, if y'all will). Each of the steps I laid out before can exist put on their canvass of clear paper. This allows y'all to manipulate each aspect of the drawing without affecting the other, merely when you put them together they provide a cohesive image.
If you're going to work with digital art you lot'll have plenty of programs to choose from, but layers piece of work the same in nearly everyone.
Your selected layer is the ane you're currently working on and manipulating. Whatsoever work y'all practise will be locked to this layer, and it won't change anything on other layers.
Your mode and opacity modify how the layers interact and blend.
There are buttons to allow yous to add together as many layers as you want.
Yous can even copy, delete, or hide layers, likewise as rearrange them. This is where digital fine art begins to stray from traditional art.
In traditional art, your subjects take fixed positions, but in digital fine art, you tin rearrange this. If yous change your mind and make up one's mind you desire your person in front of the table instead of behind information technology this is as easy every bit rearranging the layers they are on.
If you're unfamiliar with digital art I propose sticking to one program and following tutorials designed to familiarize you with the layer system. Yous'll likely find that there are some things y'all prefer in digital art (instead of labor-intensive erasing, yous can merely click a button and all those lines disappear).
I find that nada compares to the nostalgia and hands of the feel of traditional mediums, though I'm happy to familiarize myself with both.
Related Questions
Is at that place a way to layer using both traditional and digital layers?
If you browse in your traditional artwork you can use it as its layer in digital art. Monika Zagrobelna outlines her specific method for scanning traditional art here.
Tin can y'all use these methods with mediums other than graphite and colored pencil?
The bones steps outlined in this article tin can be applied to other mediums, merely keep in mind each medium has its unique qualities. Pigment volition not interact with graphite in the same way as colored pencils.
What are the cons of drawing layers?
There aren't many, but I imagine that if yous're in a blitz with your work you lot might not wish to spend actress time planning it out. If you lot don't like working from an outline then drawing layers may non be for yous.

Maximize the benefits of coloring with my gratuitous adult coloring eBook and by signing up for my electronic mail newsletter HERE !
Please note: This blog post is for educational purposes only and does not constitute legal or medical advice. Please consult a legal skillful or medical doctor to accost your specific needs.

Source: https://coloringmasterpiece.com/how-to-draw-layers/
Posted by: scottmusur1939.blogspot.com
0 Response to "How To Use Layers To Draw"
Post a Comment